Self-studies old
The eMath method
The eMath method uses the digital eMathStudio learning environment in combination with mastery learning for a self-study course.
Mastery learning
The self-study course is dividd into a number of topics. Each topic has a number of theory pages and an assignment page. The student reads the theory in the thery pages and then solves the required assignments for the topic.
Mastery learning means that a student is allowed to continue to the next topic in the course when he/she has solved at least 80% of the required assignments for the current topic.
eMathStudio
eMathStudio supports mastery learning by providing (i) a simple langauge called structured derivations for writing the solutions of an assignment, (ii) an editor that is designed for structured derivations, and (iii) an automatic checker that checks the correctness of a structured derivation in real-time.
The structured derivation language is very close to standard mathematical notation, while at the same time showing clearly the logical structure of the argument. The editor makes it easy to create and update the solution to an assignment. The checker gives immediate and personal feedback to the student while he/she is solving the problem.
Study path

The self-study textbook has a Study path that you should follow. The study path symbol is shown on the right. It marks the assignments that you should solve in order to master the topic. It also shows how many points you get from solving the assignment (1 = easy, 2 = medium, 3 = some challenge). None of the assignments are difficult when you have read the theory for the assignments.
The total number of points that you have earned for an assignment page is shown on the top of the page, together with the percentage of the required points that you have already gathered.
Mastering a topic
- You start on a new topic by reading the theory and studying the examples that illustrate the theory.
- You then tackle the assignments given for the topic. You solve the assigments in the study path one by one.
- You can move on to the next topic when yu have a correct solution to at least 80% of the required assignments.
Solving an assignment
You solve an assignment as follows:
- Analyse the problem described in the assignment and try to come up with an initial plan to solve it. Look in particular at the examples shown on the theory pages, are there similar ones.
- Use the editor to write a structured derivation to solve the problem.
- Check the correctness of the derivation with the checker. The checker also checks whether the answer is correct
- If both the derivation and the answer is correct, then you have a correct solution and you can move on to the next assignment.
- If there are errors in the derivation, or the answer is not correct, then you need to get back to your solution, identify possible errors, and fix them. And then check again.
- Repeat this until you get the solution correct.
- You can use the Notes room to share an assignment and your solution attempt when you get into probles.
When is the solution correct
You write a solution to an assignment and check the correctness of it in the Solution tool. A solution to an assignment has two main parts:
- The derivation (mathematical reasoning, calculation, proof) that leads from the initial assumptions to a final conclusion. We refer to this tas he derivation of the answer.
- The answer that you give to the problem stated in the assignment.
The derivation is written in the Solver tool as a structured derivation and Its mathematical correctness is checked by the automatic checker. The checker also checks whether answer is correct. The solution is correct when both the derivation and the answer are correct. The checker states whether the solution is correct.
You get the full points for the assignment when the solution is correct. Otherwise you get zero points.
Solver tool view
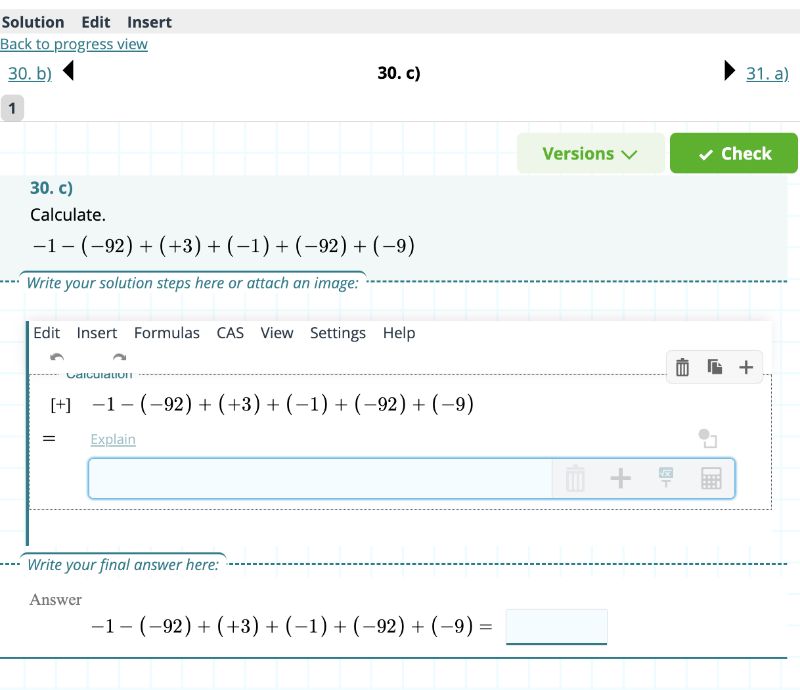
Below is an example of the Solver tool view. It has four parts: a navigation bar (to the previous or next assignment), the assignment number and assignment text, the derivation of the answer, and, the answer to the assignment
Finding the correct solutions
The requirement that you only get points for a totally correct solution may seem harsh. However, finding a correct solution is made much simpler by using the automatic checker. The checker gives immediate and detailed feedback on your solution.
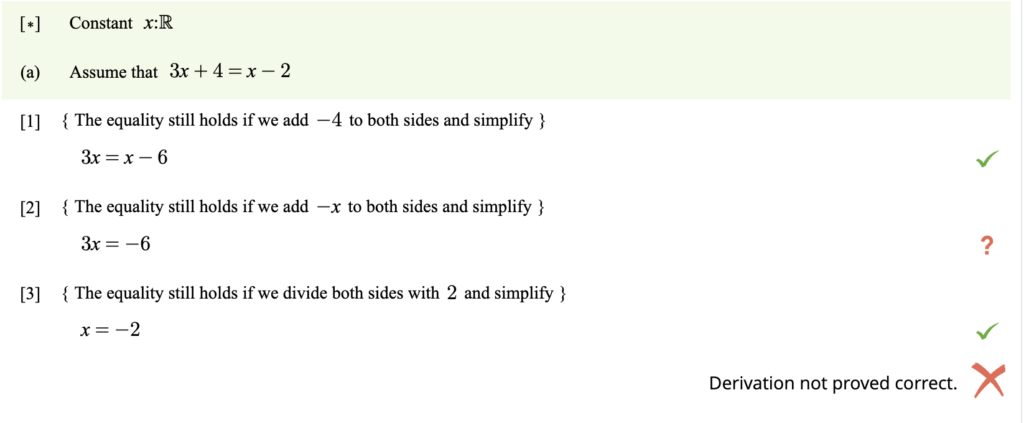
- The checker marks all derivation steps that have been proved correct with a green check mark (V).
- The checker marks all unproved derivation steps with an orange question mark (?).
- A derivation step that the checker does not understand (a syntax error) is marked with a red x-mark (X)
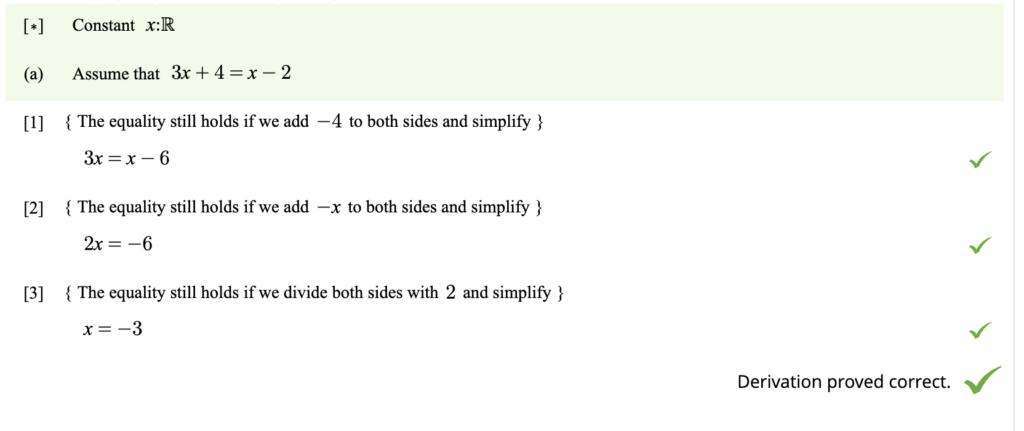
- The derivation is correct if each step has been proved correct.
This is an efficient way to learn the topic. Learning happens when you go back to your solution, trying to understand what the problem is, and working out how to fix the problem. There are fewer assignments to solve with mastery learning, but you have to work more on each assignment. In the end, this is the way you will eventually master the topic and become ready to move on to the next topic.
Checking view
Derivation with an error:
Error fixed:
Status of an assignment
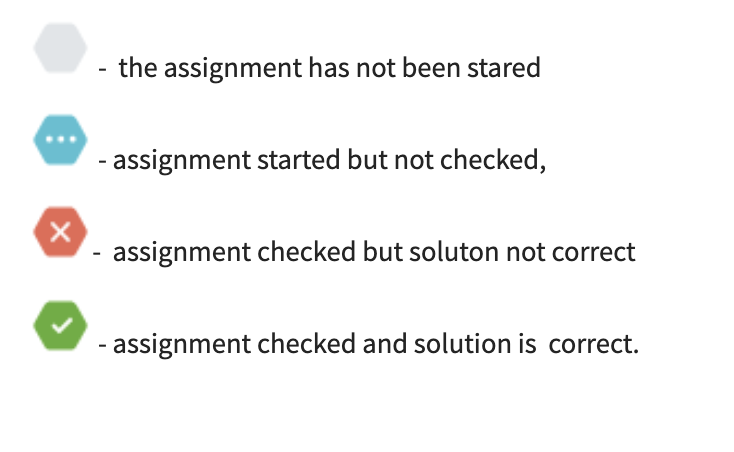
The system shows you the status of each assignment on the assignment page with a coloured diamond, as shown on the right
Markings
Following your progress
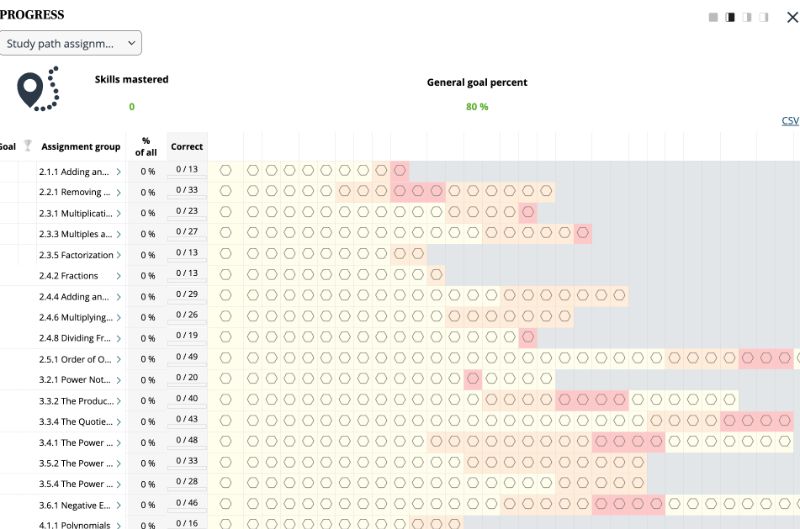
The eMathStudio includes the Progress tool in which you can follow your own progress in the textbook. The study path table shows an overview of the topic that you need to master. For each topic, it shows which assignments that need to be solved in the study path, and whether the assignment has been solved or not. You see the total points that you have collected this far for the topic. The topic is marked as mastered when you have solved 80% of the study path assignments correctly.
Choose Progress table from the Tools menu to open the progress table for self-studies. Click on an assignment in the Progress tool to open the Solver tool for this assignment. In this way, you can switch between the overall view and the details of a solution. Clicking on the Progress button in the Solver tool takes you back to the Progress tool (or, alternatively, choose the Progress table from the Tools menu).
Study path – progress table